


Upgrade your RV's ducted or ductless AC with this complete system from Advent Air. New R32 refrigerant meets 2025 EPA regulations. Not backwards compatible with any AC systems from 2024 and earlier.
Features:
Specs:
Notes:
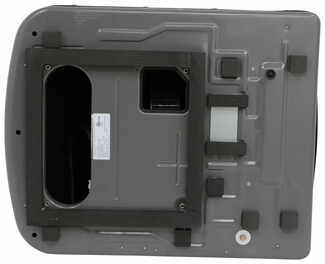
The AC unit includes an air distribution box with a built-in thermostat. The thermostat has an LED digital display that lets you control the mode, fan, and temperature settings. If you add an electric heat strip (sold separately) to remove the chill on cold mornings, then the thermostat also controls the heat setting. Additionally, there are adjustable registers on the front and back of the box. These can be tilted up, down, or side-to-side for directing the air where needed. The removable air filter prevents dust and dirt from building up on the fan blades.
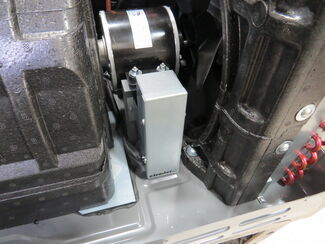
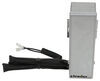
If your campsite or generator isn't able to draw the power you need, then you may have difficulty starting your AC unit. The included start capacitor, however, can eliminate this problem. The capacitor stores energy that will later be used to jumpstart the AC. Once the sufficient amount of power has been supplied to the AC, the compressor will start to run, and the internal relay switch will turn the start capacitor off. At the same time, the compressor will send "back voltage" to the relay switch and capacitor in order to energize them for the next startup.
Because your RV is likely already prepped and pre-wired for an AC unit, installation is simple and easy. Most AC units, including this one, are designed to fit an opening that measures 14-1/4" x 14-1/4". Depending on your roof setup, you may need to do minimal alterations. If the opening is larger than 14-3/8" x 14-3/8", you will need to install spacers between the sides of the unit and the opening's edges. If the opening is smaller than 14-1/8" x 14-1/8", you will need to enlarge the hole to fit the unit snugly inside the opening.
On the bottom of the AC, there's a thick, collapsible gasket with 6 noise-reducing foam pads. This provides support between the RV roof and AC and seals the opening to prevent water and outside air from leaking in. Because of this, the use of fresh sealant isn't required during installation.
To install the start capacitor, bolt it to the fan motor support with the included hardware and then route the wires to the run capacitor.
Once installed, the hard plastic cover on the AC can easily be removed for maintenance and cleaning.
2-Year limited warranty covers defective units when installed correctly on approved applications. The warranty does not cover units installed incorrectly. To ensure air conditioner is installed correctly, please see the questionnaire pdf below. A filled-out questionnaire is required for warranty coverage.
If you are not comfortable using a voltmeter (or removing the charge from the start capacitor), you'll want to make a service appointment with your local RV dealer to verify the installation. Print the pdfs below (warranty- questionnaire, warranty dealer information) and take them along with the RV to your local dealer. ASA does compensate dealers for warranty work as outlined in the dealer information pdf. You may be charged by the dealer for time spent investigating the installation.
California residents: click here
Videos are provided as a guide only. Refer to manufacturer installation instructions and specs for complete information.
Hey there, neighbors, it's Kevin with etrailer, and today we're gonna be taking a look at and showing you how to install the Advent Air RV air conditioning system here on our 2021 Keystone Passport SL series travel trailer. Whether you're looking to replace a old, worn-out unit, or you're wanting to upgrade from a 13,500 up to a 15,000 BTU-rated unit, Advent Air is going to have you covered. They've got everything you need. Whether that's gonna be a ducted or a ductless setup, they have just the right system for you to keep your trailer nice and cool when you're out on those camping trips. This kit is going to be all R32 compliant. So this is using a newer refrigerant in it, so that it's maintaining those EPA standards.
Now you will wanna make sure that you are swapping out all of your components because this is not gonna be backwards compatible and it's not gonna be compatible with other brands. You are gonna wanna make sure that you're swapping over to all R32 equipment, which this is going to include the rooftop unit, the air distribution box, and also the wall thermostat, as well as a soft start, so that way you can draw a little bit less energy from the power grid and have a little bit more stored up inside of that soft start, so that way your unit can start up a whole lot easier without that massive power draw every single time the compressor wants to kick on. Now with our rooftop unit, we can get this in two different colors. We have the blackout here today, but you can also get this in white, so that you can match everything else that's on the roof of your trailer and really keep that aesthetic. In terms of the BTU rating, like I said before, we we inchesre upgrading up to that 15 with our unit today, but they still do offer those 13,500 BTU-rated units in these same kits, or all separately if you are just piecing together a few different components, so that way you always have exactly what you need.
Now in terms of installation, this one is pretty simple. The air distribution box that we have is designed so they can be used with either a ducted or a ductless system. So there isn't going to be a bunch of troubleshooting or trying to figure out how we're gonna make this work just because we may have ordered the wrong kit. This one's gonna have exactly what you need either way. Aside from that, wiring this all up is pretty simple.
The bigger thing is really just kind of figuring out what the factory wiring is inside of your trailer. So as you're kind of pulling apart the old AC unit and disconnecting everything, just take little notes, figure out exactly what that function is for that specific wire. That way when you swap over, it's gonna be a much quicker install. To start our install, we are gonna need to come inside first. We're gonna be taking down our air distribution box and the four bolts that are gonna actually mount up and clamp the rooftop unit to our roof.
So to start off, I'm gonna be popping out these little caps here to reveal our mounting hardware. And I'm just using a pick. You could also use a flathead screwdriver if you had a thin enough one. (drill whirring) Just have to pull back on our vent cover, see which way this one goes. All right, goes that way, pull it down, and we've got two screws here holding it to the main assembly. And that looks like two more running up into that framework too. So we have four here to remove. (drill whirring) (drill whirring) (drill whirring) Now when you remove the last one, be sure to have a hand on it 'cause you don't want this to fall on top of you. (drill whirring) And there's two screws on our mounting framework here, and I'm gonna pop those out. And then I'm also gonna pop out the screws holding our control box here. This is where our 110 wiring is coming in and connects to everything. I wanna keep that separate, a little bit less weight on it. So I'm gonna disconnect that from the framework here and we can pull that down. (drill whirring) (drill whirring) (drill whirring) (drill whirring) For these bolts, I'm gonna be using a 3/8 socket, pop those out. (drill whirring) (drill whirring) (drill whirring) All right, this last one, make sure you got a handle on it. (metal clacking) And now we have essentially a junction box here. So I'm gonna pull this cover off. Now before you touch any of this stuff, you definitely should make sure that you are disconnected. We don't have the trailer plugged in right now specifically for this reason. We don't wanna make. Wanna make sure that we're nice and safe while we're taking this apart here. I'm gonna kind of position that up a bit better so I can see what I'm doing. (drill whirring) And then we'll take off the cover. (drill whirring) (drill whirring) You can see our connections. We've got our 110 hooked up here, so we can just start disconnecting that. I'll take these wire nuts off. All right, I'm gonna need to loosen up the strain relief. (drill whirring) (drill whirring) We should be able to pull this out, just need to straighten it up a bit. And from here, so it looks like we have a six-pole plug, or six-pin plug, I should say. Disconnect that. And this is most likely going to be power and ground. And then we probably have communication wires with this guy running over to our thermostat. And this is running up into the main unit, so that's not something that would be passing along to the next set. But we are gonna need to get in here to the 12-volt stuff. So it looks like I am gonna have to pull just a bit more of this stuff apart to get to everything. Now it'd be a good time take a picture, figure out exactly which each one of these wires is connect to, and then we can figure out based on the wire diagram that's on this box exactly what their functions are. So that way when we go to switch over to the new one, it makes it a lot easier to figure out exactly what each wire is used for. This wiring here, like I said, probably gonna leave my power and ground. I already disconnected the control box from it. And we're gonna see, looking at my multimeter, I'm getting 12 volts. So this is right. If it was reversed, it'll flip-flop it, it'll say -12 volts. So that's an easy way just to confirm. So you can see. Now we need to figure out our furnace, that's the more important factor here. So I'm gonna stick my ground lead back in. We're gonna come over to our wires here. So the red one and the black one are clearly the ones going to our furnace, and we're labeled as such on the control box. But the problem was both furnace wires are the same color and they're both labeled the same. So kind of doesn't really help you too much. So if we stick this in here, one of these wires we aren't gonna see any voltage on and one we will see 12. So this one's got zero voltage. So whenever our thermostat hits a certain temperature that we have set for the furnace to kick on, it's gonna now send power through this wire and turn on our furnace. This wire over here is to just give it power, constant power. And if I actually hook up to the right thing here, we should see 12 volts, which we do. So we know this is our constant run to our furnace, this is our intermittent, and this is the one that we, for sure, need to tie in with our controller on our new AC system. The constant 12, we might have to just cap off. Our rooftop unit's actually loose too. We're gonna get up on top, we're gonna get our old rooftop unit out of the way, we'll get our new one up there, and then we can come back inside and we'll get everything with our air distribution box, all that wiring, all those screws that we're gonna need to put in, all that done at that time. So let's get up on top. We're gonna harness up. This is a part at home where it's probably gonna be pretty challenging. You're gonna need a couple ladders, some really strong friends to help you lift that AC unit up on top of the roof, unless you have some heavy equipment, like a forklift, so you get it up there. So this might be a time where you wanna reach out. and use our dealer locator, and you can find a shop near you that can get that up onto your roof safely and get it installed professionally. Now, I've got this set in place. I am gonna have to probably make some more minor adjustments. But unless you have a second person down inside the trailer to kind of help guide you, it is a little bit harder to do from the top. So I'm gonna go down, we'll take a look and see where we need to be at, and maybe, like I said, move it around just a little bit more, but feel pretty confident that we have this in a decent spot. Now I've made some minor adjustments, kind of got that moved around. We can pull down our six-pin plug from our rooftop unit, and we're gonna grab the free sensor out of our packaging here and we're gonna pop that in. There's gonna be a little blue holder in the coils here. We're gonna stick that into. It's not gonna go in very far, so you don't have to press too hard. But we'll pop that in and we'll leave this loose down here. This is gonna plug into our new controller, so we'll have an easy, it'll plug for that. With that being said though, we can now grab our controller and our framework here, and I'm gonna start loosening some of this stuff up, get this ready to start passing our wires through. So also pull off that cover right there. And you can also see on here, it's got a nice little display of what each wire is, the color, and then what its function is. We've got our framework here. We're gonna have to pass all of our wiring through so we can get this up into place. And then we'll also grab those four bolts that are in our kit that are really long. That's what's gonna help hold this up and hold down our rooftop unit. (metal clacking) Snug down each of the four bolts, just until the frame here hits the ceiling. But we still need to tighten it more 'cause we're gonna actually compress down the foam gasket that is sitting between our rooftop unit and our trailer's roof here. So like that's gonna get compressed about halfway. And since this is such a low-torque value, we are using a torque wrench you most likely aren't gonna have, unless you are a bike enthusiast. This is a much smaller, fine torque wrench, and we're gonna be evenly tightening these down here. So I'll do a little bit here, kind of work my way across. It's not really a star pattern since we only have four. But essentially, I wanna kind of go diagonal, across, diagonal, across. That way I'm trying to keep this all even, so that way one side doesn't get pinched, get a little too tight. And then once we start tightening down other bolts, then it loosens up the others. So a little bit at a time, just keep working your way around. And like I said, you should see that gasket compress about halfway. (ratchet cranking) And that one's clicking. Start out with our 110 wiring. And before I get too far, I want to make sure that I take the cap for the strain relief and put that on first, so that way when we get it on there, we can screw it right in, pass our wiring through. I can get it pulled down. Once you get enough in there, now you can tighten down that strain relief cap. And that's also gonna lock that in place so it can't wiggle free. Now we can use our wire nuts that we had previously. We're just gonna reuse those. Get that nice and tight. And then I'm gonna finish these off with some electrical tape too, just to make sure that they don't come loose Before you put that on though, make sure that you give it a little tug on each wire. Make sure it ain't kind of potentially slip out. I want to have nice contact. Now we're gonna tuck our wiring back up, which is sometimes easier said than done. We one that's gonna be easy is our six-pin. It's only gonna go on one way. If you take a look at it, two sides are kind of V-shaped and then one in the center is V-shaped on the other side. So we just wanna match that up. So I need to actually flip this around. Oh, sorry, Put that in place. The other one over here is an optional heat strip connection point. We don't have that today, so that's not gonna be an issue for us. Our free sensor is also gonna be a little black connector. We're gonna grab that and we'll pop that on with a free sensor wire. I'm gonna tuck that out of the way, less and less here, so we have a little bit easier of a job. All right, let me read what power, the heat pump, heat pump. So we don't need that one. Now, before I start messing with my thermostat wiring over at the air distribution box, I'm gonna also disconnect my thermostat. These are all gonna be pretty similar. Usually, you're pulling something off or you're twisting to get it removed. With ours, looks like I'm gonna need a much smaller screwdriver than what I have with me. We're gonna undo those screws right there. That's gonna get our wiring that runs from our air distribution box over to the thermostat out, and then we can strip back the casing a bit more 'cause they cut off that fourth wire and we are gonna need that fourth wire. Now, if you're in a setup where maybe you didn't have that many wires to begin with and you needed that, what you're gonna do is go purchase yourself some wire from your local hardware store. And usually, you can find this in like six or seven wires, something around that. So that way you know you always got extra to go with. And what you can do is tape on your wire to the other end of this up in the air distribution box, 'cause it's typically always gonna be easier to pull down versus trying to pull up. And what I'll do is then I'll come over to this side and I'll yank this through the wall since obviously we're not gonna be able to get into it with the trailer built up as it is. And then you can just pull that right on through and you'd pull your new wiring through with the old one. And then as you pull it out, you can undo that tape and you've got all the wiring ran through and fished through the walls that you're gonna need, so that you can hook up your new system. But in our case, since we have it, like I said, I'm just gonna cut back the casing a bit more so I can get to all those wires and we can take off our little mounting bracket here for a thermostat. (drill whirring) If you are gonna cut your wires, like I'm doing right now, make sure you cut each one individually. So I cut power first and then ground. I don't wanna potentially run my snips across both in case there is power still on that line. We have power running through from our battery right now just, so that we have the lights on so we can see a little bit better while we work. But we, like I said, we're not hooked up to 110, so hopefully shouldn't short anything out if you accidentally did touch the two wires, but just as an extra precaution. Now, I'm gonna start on my thermostat, and I am gonna match color for color, except for one of 'em. Obviously, this is gonna change depending on your setup, but I'm going red for red for my power for the thermostat. Purple looks like purple is B, A is blue, and those are just communication wires, and then green is gonna be another communication wire. But, like I said, I'm gonna match color for color. The purple often just do to white though. It's hard to see in this lighting though. All right, make sure you get a nice tug on each connection. Don't want to have these coming loose. And then I'm gonna cap each one of these with some electrical tape as well. Now I'm gonna switch over to the furnace before I hook up power and ground. Now, remember, we tested these two wires that ran over to our furnace, and the red one had no power, which means that that's the one that we're gonna send power to wake the furnace back up. And then this one had constant power. So that one we're gonna cap off over here 'cause we don't need that for our setup today. Using this brown wire here that says, "To furnace 12 volt power," we're gonna splice that to that red wire that we have, wind that all up. We've got a wire nut to that one too. And it's still kind of loose just because this is such a thin gauge. There we go, get that tight. As I'm completing each one of these, I'm also just tucking 'em up out of the way. Last here, we have power and ground. We already know green is our power, white is our ground. I'm gonna have to uncrimp these crimp-on connectors, one at a time here. So red, on our controller, is gonna be power. And finally, we'll do the same thing with our ground. All right, now I'm tucking this up out the way. We do still have a couple other things we need to do up here but I want to test the system first, make sure everything's working properly. So we're gonna go over to the thermostat and get that plugged in. Then we can check it with power. Once we're done with that, we also need to get our little divider in here, which I've got sitting over here. Now this divider is gonna sit up against it, just like so. And you can see there's some double-sided tape on there too. We'll have to remove that, we'll get this into place, it'll stick right on there, and we wanna get this up as much as we can, really seal that up. It's got a little foam gasket up top, and then they give you a foam double-sided, or one sided cover here that's gonna stick to this and stick to our divider. Now, if you needed to, say, you had a smaller roof height here, you can also rip this piece off down here. It's just little welds right there, just kind of barely holding it on still. So you could easily just bend it, snap it off. Now in our case, we have a little bit more than 2 1/2 inches, so I will have to leave that on, so that way I have something to stick to once we get ready for this. But like I said, let's go get our thermostat on, make sure everything's functioning properly before we do anything else. So looking at our thermostat, on the back is where we're gonna have our connections. If we look at the bottom of it, there's a little bit of an indent here. We can press that to pop it off. And just down there at the bottom is where our temperature sensor is. And that you can see, even with the case on, sits right there. I've already loosened up these screws. Now we just need to actually match everything up. So this is where we wanna remember exactly what we had hooked up over there as well. So I know my blue and my white or my communication wires, red is my power, and green was comm. Take your mounting bracket, put that on first. We don't want to have all of our connections made and then have to undo 'em all just to get that back on. We've got 12 volt is our red, put that in there, and then we've got my screwdriver. Oh, popped up. Green is my comm. So we'll go in. There we go. And it's already light up 'cause now we got power. Now B is our purple, which I had put to white, and then A is our blue. You can give those just a tiny little tug too and make sure that those are still good. And then we're gonna have to bend this to fit that hole, and also sit with our bracket here, so. But I also want to try and cover up my old mounting holes. So let me get over here and look. They do not include mounting screws, so I had to do that. I already just reuse the ones that I had originally. (drill whirring) Now, I wanna make sure that this is level. It looks pretty good to me. Let's maybe move it slightly. Look good to you, Tom. All right, now that we're happy with it, we can put the other screw in. And one last thing that we should look at too is also our dip switches. So that's these three little switches here, and they have a nice little display sticker here that tells you exactly what they're for. So the first one is for a heat strip, second one's for a heat pump, third one is for a furnace. So we don't have a heat strip. We don't have a heat pump, but we do have a furnace. So we are going to have the furnace one on on, and the heat pump and the heat strip on off, which we do. So we're all good to go. So at this point, we can pop this back on. Hooked up to shore power. I turned on our thermostat here, it instantly went to cool. It's running. Let's double-check, make sure we got air blowing out the way we want. So here, I can grab a little, our paper towel be better here, let's grab that. So you can see, blowing air here and pulling air up over on the other side, right how we want it to be, so we know that's good. So I'm gonna turn this back off. Now we can get that divider in and we can close up the rest of this and get it all nice and sealed up and be ready to go. Get the backing for our double-sided tape off. And now we can get our divider up. And I'm gonna press on that as much as I can to get it up sealed up against the rooftop unit as best I can, and also press it in to our double-sided tape. All right, so. I trimmed down the seal that we have too. I'm gonna get that into place hopefully without it slipping to the wrong spot. There we go. And now I can trim down this length here. Let's match up with our vent, our duct work. And I'm actually gonna go in with some more HVAC tape, just the corners here to really seal this up, make sure that we're not sucking in that cold air that we're blowing right out. We don't want to keep cycling it up here in the rooftop unit because that's how you end up having your rooftop unit, condenser coils start to freeze up. Right now, we have this disconnected, it's all open. We've got that cover up. We can actually see our mounting screw holes here. We're gonna line this up, make sure everything's fitting nice, and then we can grab our screws to actually mount this into place. Like I said, that's one your little test dry fit here, make sure I like how it looks. Sometimes you'll have a transition strip between your two pieces of your roofing. So like this guy right here, sometimes that's gonna be in your way and it's gonna prevent you from fully tightening down your air distribution box. So you might have to trim that. In our case, we lucked out. It's right in the center of a panel here, so we don't really have that issue. But, yeah, this looks all good to me. Let's grab our screws and we get this tightened down. (drill whirring) Get one side on and we'll come back to the other side. So this will hold itself up. (drill whirring) All right, there's gonna be two more screw holes, you'll see here and here on the edge, and those are gonna go directly into the roof, so we can drill right through. (drill whirring) Now be careful when you're doing this. Don't go too tight. You don't want to accidentally crack this 'cause it is plastic. (drill whirring) Make sure it's just snug. And then we'll have a couple of caps that we're gonna pop into place here. Just make sure you line the tabs up. You can see there's a little cut out here and there's a cut out here. That way you can get a flathead screwdriver or a pick or something else in there later on to pry it out with a little bit easier. And that's it. The last part in our kit is going to be our soft start. So we are gonna have to be back up on the roof and we are now gonna also remove our shroud. I've already taken off the screws on the other side and the back already, and these are just gonna require a Philips head bit. (drill whirring) (drill whirring) (drill whirring) Once you have all the screws out, you can then pop off the shroud. What we're looking for is on our passenger side, it says, "Dust cover boot," right here. We are gonna snip the zip tie off of that guy and pull him off. Now, over on the other side, the driver's side here, we've got our mounting bracket, and you're gonna have two little screws, just little Phillips side bits, and we are gonna mount this up. I might actually, I'm gonna to grab an extension too. This isn't gonna be long enough for me to get all the way in there with my drill. So now, I got a longer extension here, we can put that mounted up. (drill whirring) (drill whirring) Now we're gonna wrap our wiring under the motor here over to our capacitor that we took the cover off of earlier. We look at our run capacitor, there's gonna be labels for each terminal set. So the first one says, "Fan," middle one says, "C," for compressor. Last one is HERM, H-E-R-M. So one of our wires, this one right here, is gonna go onto our terminal, the red wire here on the HERM, The other one is gonna go to our white area over here in the middle with that C. It's gonna fight past the other connectors. Now we're gonna take that zip tie included in your kit and our dust cap here, and we're gonna run that through. We'll cover this all back up. Once you got that over it, then you can tighten down your zip tie, snip off the excess. And the last thing to do is we now have a new sticker. I'm gonna leave the original one on there, but I'm gonna put this next to it. It's essentially the same diagram, but it has a little add-on section to it, showing that we have this start capacitor on here. So if anyone else gets in here later on and needs to disconnect this, or maybe they need to work on it or anything, now they have a proper diagram, showing everything that we have installed. Then installed, we can now set our strap back on and get that screwed back into place. (drill whirring) Now that we have the soft start installed and we've tested our system, make sure everything's still functioning properly, that's gonna do it for our install of the Advent Air RV air conditioning system here in our 2021 Keystone Passport SL series travel trailer. My name's Kevin. And if you still have some questions about what's gonna be the right air conditioning system for your trailer setup or you still need some help with the install, please feel free to reach out to us via our ask the experts link, a comment on this video, or a phone call to our customer service department. We'd be happy to help you out on your journey.

Do you have a question about this RV Air Conditioner?
Info for this part was:
At etrailer.com we provide the best information available about the products we sell. We take the quality of our information seriously so that you can get the right part the first time. Let us know if anything is missing or if you have any questions.


Thank you! Your comment has been submitted successfully. You should be able to view your question/comment here within a few days.
Error submitting comment. Please try again momentarily.